Irish Brown Bread

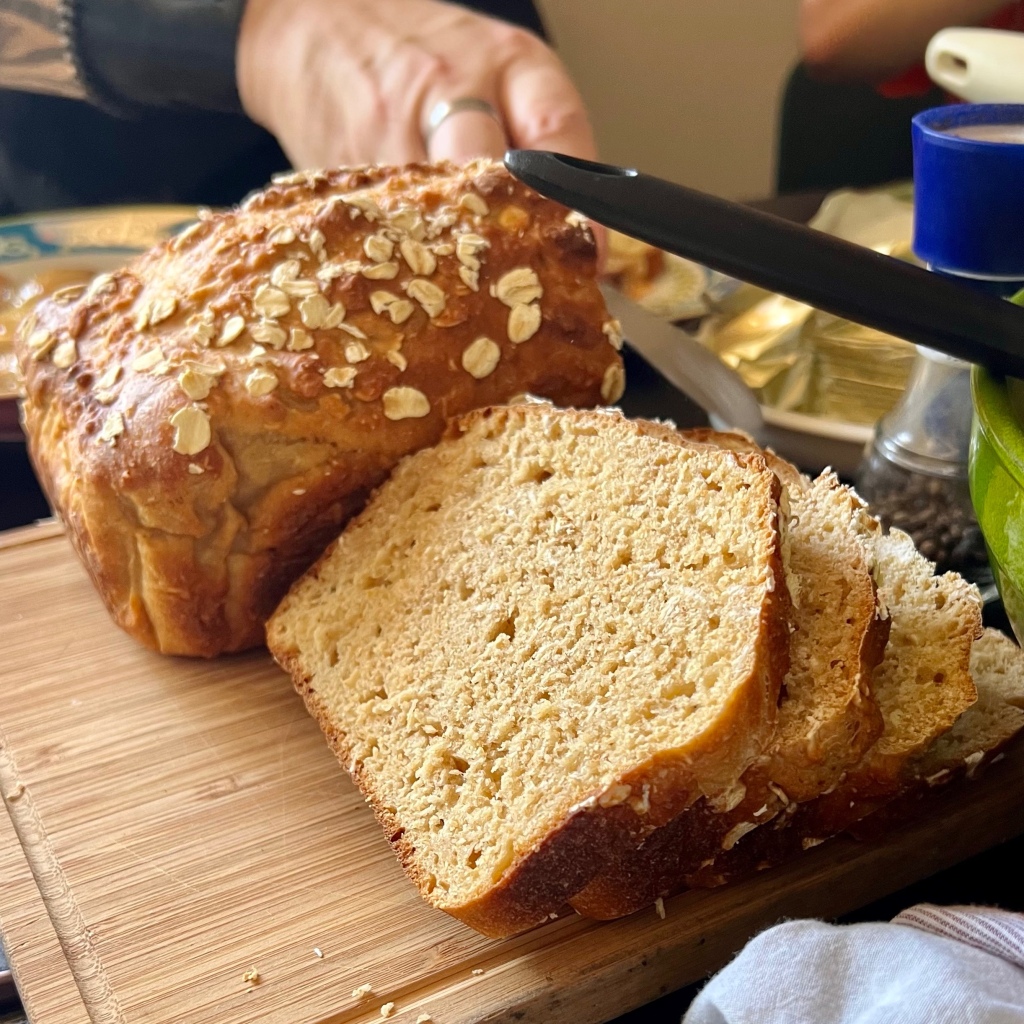
This is not a wholemeal supermarket loaf, or an artisan sourdough style, but a type of soda bread.

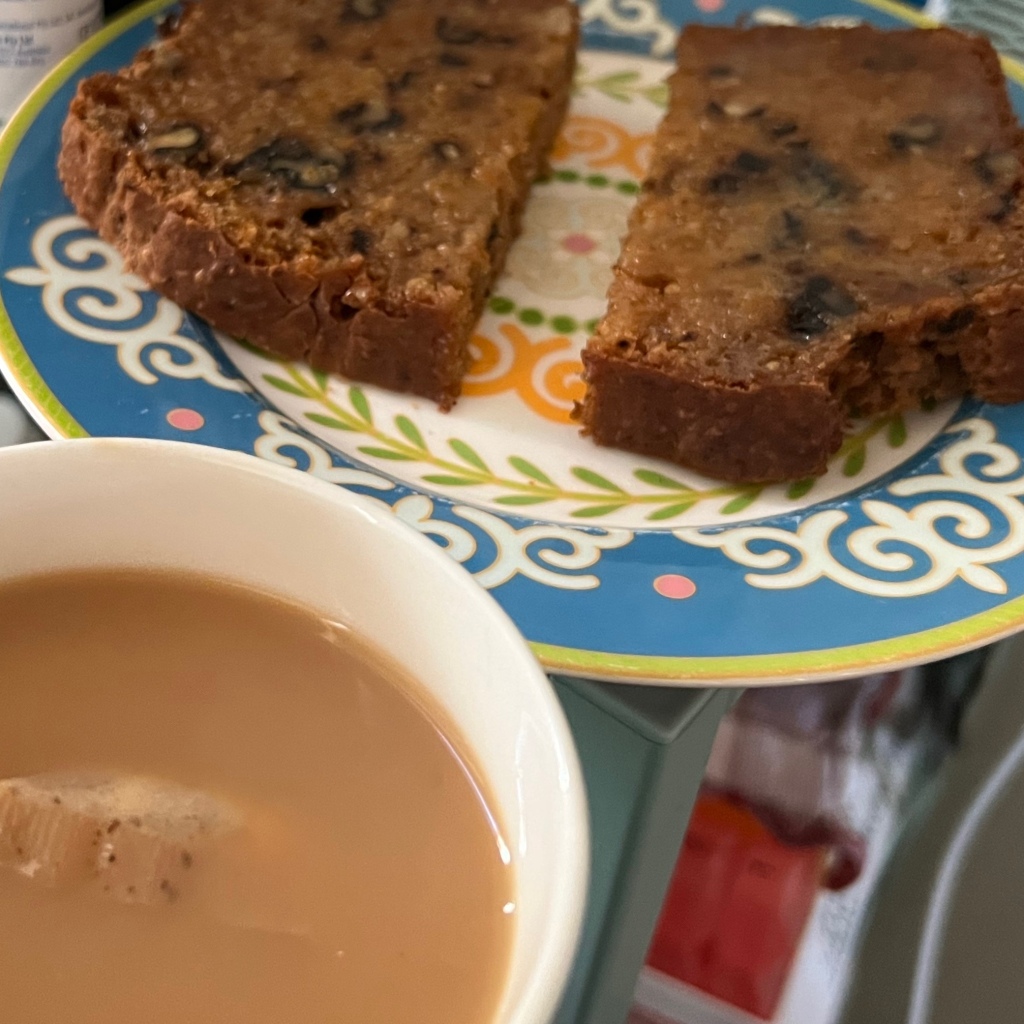
In Ireland, you wouldn’t call call it Irish Brown Bread because it’s just brown bread. And it’s *everywhere*. I’ve had it in shopping centre cafes and in the fanciest of restaurants in Ireland. Everyone’s Mammy has a recipe. I got my first recipe off my daughter’s Nanna, and adapted it to my own

You will need: a loaf tin, a large mixing bowl, and a smaller mixing bowl

Preheat your oven to 180C

Irish Brown Bread in its baking tin, surrounded by baking paper

Ingredients

  • 4 cups wholemeal flour
  • 1 tsp baking soda
  • 1 tsp baking powder
  • 1 tbs salt
  • 1/2 cup rolled oats
  • 600 mL cups buttermilk
  • 1 large egg (lightly beaten)
  • 1 tbs molasses or Guinness (optional, for colour)

Method

1. In a large bowl, mix all the dry ingredients

2. In a smaller bowl, mix the wet ingredients

3. Pour the wet into the dry and mix well. It’s going to be a very wet mix. You want that. It creates a good crumb

4. Line a loaf tin with baking paper. You can also grease it to keep the baking paper in place while you pour, but I never do

5. Run a knife (or preferably a bread lame) along lengthwise along the top of the bread, to create an escape for the steam. It also looks cool when baked

6. Top the loaf with any leftover oats you have. It’s not essential, it also just makes it look cool

7. Bake in a 180C oven for one hour and 15 minutes. Yes, 1 hour and 15 minutes

8. Serve warm, sliced thick, with Kerrygold butter, or as part of a meal (like seafood chowder)

Sliced brown bread, plus half an unsliced loaf, sitting on a wooden board
Posted in Uncategorized | Leave a comment

Carrot and Walnut Loaf

Too many carrots arriving in your weekly veg box, your children refuse to eat them for crunch and sip, and you’ve run out of ways to hide them in dinner? Hard same.

Ingredients

  • 2 cups plain flour
  • 1 cup of bran flakes
  • 1 cup brown sugar
  • 2 tsp bicarbonate of soda
  • 1 tbs baking powder
  • 1 tbs ground cinnamon
  • 1 cup plain Greek yoghurt
  • 1/2 cup of milk (more if the mixture is not wet enough)
  • 1/4 cup of olive oil
  • 2 eggs
  • 2-3 cups grated carrot (literally whatever you have in the fridge)
  • About 100gm chopped walnuts

Method

  1. Preheat oven to 180C
  2. Grab an extra large bowl and mix the dry ingredients together (not the carrot or walnut)
  3. Grab a medium sized bowl and whisk all the wet ingredients together. It needs to be whisked because the yoghurt has a lot of fat globules you need to break down to make it smooth (don’t add the carrot or walnut yet)
  4. Add the wet to the dry. This is where you might discover it is too dry to be a loaf batter. Add 1/4 cup of milk at a time until it becomes a pliable, but not sloppy batter
  5. NOW add the carrot and walnut. Stir until just mixed
  6. Line a loaf tin with baking paper. Some people butter the tin first, but that seems like a waste of time to me. If you scrunch up the paper real good before putting it in, it’ll create folds that hang onto the loaf tin instead of flapping about
  7. Pour the batter into the lined loaf tin. Tap the tin on the table a few times to get rid of air pockets
  8. Bake in the oven for 45 mins. After 45 mins, check using a skewer (this means stick a long thin thing into your loaf. Whatever long thin thing, doesn’t matter, as long as it is clean). If it comes out wet, put the loaf in for another 15 mins, covered in foil to prevent the top burning
  9. Keep checking every 15 mins. Mine actually took 1 hour and 15 to finally get to non-wet stage. If the skewer comes out with dry crumbs, that’s fine – it’s a fairly crumbly loaf
  10. When you finally have a non-wet cake, pull it out, make yourself a cuppa, cut yourself a slice while it is still warm, and put butter on it if you’re really daring
Posted in Uncategorized | Leave a comment

Chicken Veggie Sliders and Zucchini Chips

This was a recipe thought up by my 11 year old, especially for her to make her cooking debut. Her brief was ‘simple and relatively healthy’ and she came up with the goods. The best part was she did all the cooking – I just guided the process. It’s a very easy one to do with kids and I highly recommend doing so.

Preheat your oven to 220C

Ingredients

Makes 10 sliders

500g chicken mince

5 zucchinis

1 carrot

2 eggs

1 tbs mustard (mild, not hot or sweet)

Salt

1-2 cups of panko breadcrumbs

1/4 cup potato starch (substitute plain flour if you have none)

10 slider sized buns

To serve

Swiss cheese

Sliced tomato

Rocket

Mustard

Mayonnaise

Method

1. Finely grate the carrot and one zucchini. Save the rest of the zucchini for the chips.

2. Combine the chicken mince, carrot, zucchini, 1 egg, mustard, and salt in a medium bowl. Mix thoroughly with your hands and enjoy the squiiiissshhh squeeeeellccchh

3. Check the consistency of the mince mixture by making a burger shaped patty. It will likely be too wet and sticky, so add half a cup of panko breadcrumbs and mix well.

4. Check the consistency again. If still too wet and sticky to make a proper patty, add a bit more breadcrumbs.

5. Put the mince mixture in the fridge for now. And go wash your hands! It’s time to slice the zucchini.

6. Cut the zucchini into whatever shape you fancy – batons, slices, you decide. The only rule is that they shouldn’t be too thin or they will burn. The thicker the better. Now you have ‘chips’.

7. Put the zucchini chips in a bowl and coat in flour (whichever type you are using). Shake the bowl around it get an even coat.

8. Break the remaining egg into a cup and beat. Mix through the zucchini chips.

9. Add a cup of panko breadcrumbs to the zucchini chips and mix thoroughly. Make sure you get right down to the bottom of the bowl, or you will end up with clumps of breadcrumbs at the bottom and none on your chips.

10. Hopefully you remember to put the oven on. Place the zucchini chips on an oven tray, covered in baking paper. If you don’t have baking paper, they can go straight on the tray, but they might stick a bit. It just means more washing up later.

11. Bake the zucchini chips for about 10-15 minutes, checking frequently after 10 minutes that they haven’t burnt. Put them aside and keep the oven warm. You’ll want to reheat them later.

12. It’s time to make the sliders! Shape the mince mixture into 10 small patties, slightly larger than the buns. You might end up with a small amount of mince mixture leftover – it’s up to you if you make more slider patties or use it for something else (I rolled them into meatballs, fried them, and saved them for another kids meal on a timepoor day).

13. Heat rice bran oil (or another grain oil) in a large fry pan, on medium heat.

14. Cook the patties in batches. I found doing five at a time was good use of the pan. Cook until brown on both sides. Add cheese to the cooked tops of the patties after flipping them, if melted cheese is your thing.

15. Turn the oven back up to high and reheat the zucchini chips.

16. Serve on sliced slider buns, with tomato, rocket (or lettuce bleh bleh bleh *spits*) and as many condiments as humanly possible, with zucchini chips on the side.

Posted in Cooking Sunday, Kids are Cooks, My Own Recipes | Tagged , , , , | Leave a comment

Raw (Veganish) Coconut Brownie Bliss Balls – nut free! (lol)

Folks, I am getting bloody tired of sending my kid to school with packaged food. While it won’t give her diabetes tomorrow, it’s not teaching her good eating habits. Besides, I like cooking stuff. That is why we’re here, after all.

Most recipes for protein or bliss balls use nuts, which is a big no-no in schools. These have pepitas and oats to bulk them up and will hopefully be filling for small tummies. They are also easy as fuck to make.

(These are vegan if you omit the honey or are not fussed about it)

Ingredients:

250g dried dates, rehydrated in boiling water and drained (they are a fuckload cheaper than medjool dates!)

1 1/2 cup oats

1 cup pepitas

1/2 cup raw cacao powder

1-2 tbs honey

1/2 cup desiccated coconut

Plus enough desiccated coconut to roll the balls in

Method:

– Put all ingredients in a food processor until smooth.

– Roll dessertspoon sized blobs into balls and roll in coconut.

– Chill in fridge uncovered for about 4 hours.

– Try not to eat them all before school tomorrow.

Posted in Cooking Sunday, My Own Recipes | Tagged , , , , , , | Leave a comment

Tofu Makhani

This is not in any way traditional, but it is kid and veggoe friendly, so it is a winner in my house.

I use a combination of coconut milk and yoghurt, rather than butter and cream, because it gives the right amount of creaminess and tang to really make the dish. Yeah, I guess that means it’s not a true Makhani, but shut up, you don’t know my life.

Ingredients

500g tofu, cut into 1-2cm dice

1 medium head broccoli, cut into small florets

200g frozen peas

400g can coconut milk

100mL plain yoghurt

125g (or half a jar) of tomato paste

1 medium brown onion, diced

4 cloves garlic, sliced thinly (or crushed, your call)

4 bay leaves

20(ish) curry leaves

1 cinnamon stick

2 brown cardamom pods

1 tsp ground cumin

1 tsp ground coriander

1 tsp ground turmeric

1/4 tsp ground fennel seed

And for umami: 1 tsp of mustard and a tbs of soy sauce

Also cook: 2 cups of brown rice in 6 cups of water

Method

1. Put the rice on. I am not going to tell you how to cook it, because I am terrible at rice, but it takes a while, especially for brown rice.

2. Fry off your onion and garlic in a good, high smoke point oil. I recommend rice bran oil. Cook on medium-high heat until translucent.

3. Add spices and maybe a touch more oil. You are trying to create a flavourful oil as the base of your dish, and onion and garlic can soak up the oil first. You don’t want it swimming in it, though. Aim for an oil slick across the pan, not a pool.

4. Chuck in the diced tofu and get it covered in the spiced oil.

5. Once the tofu is covered in oil and warmed through, throw in the broccoli. You want to give the broccoli stems a head start on breaking down, hence throwing them straight on the heat.

6. Add coconut milk, yogurt, tomato paste, mustard, and soy sauce. And salt and pepper. Let it simmer for a bit, then taste it. Too bland? Add more mustard or more salt. They are your friends.

7. Let it simmer for a bit while you have a glass of wine. Go on. You deserve it. Keep an eye on it, but you can probably leave it for about 15-20 mins.

8. Check to see if the broccoli has softened. If not, crank the heat up, let it boil for a couple of minutes. I have no shame in taking short cuts, especially in such a robust dish.

9. Add the peas while it is boiling. If you didn’t have to boil it, well lucky you, eh? Add the peas anyway. Turn off the heat once the peas are cooked.

10. Hopefully your rice is ready now. If not, we all fucked up. You, me, Jamie Oliver. In fact, I think it’s his fault.

Serve in bowls, kinda like this, or rice and Makhani separately in big bowls, if you want to be fancy.

Posted in My Own Recipes | Tagged , , , , , , , , | Leave a comment

Pork Sausage, Lentil, Spinach and Mushroom Stew with Soft Polenta

A ribsticking, hearty winter dish that will cure all ills.* It can be a bit of a juggling act for the novice cook, but if you time it correctly, it cooks quickly enough to be a midweek post-work meal.

*Maybe. I'm not a doctor.

Ingredients

800g good pork sausages (thick ones with a good amount of fat, from a good butcher. None of those crappy supermarket ones), peeled of their skins and sliced into meatball sized pieces
2 400g cans of brown lentils, drained
1 bunch of English Spinach (or kale, or silverbeet), washed and sliced
250g mushrooms, sliced
2 cloves of garlic, finely sliced
1 medium onion, diced
1 750ml bottle of tomato passata

1 cup of instant polenta
Enough water to make soft polenta, as per the packet's instructions (I used A LOT – probably about 1.5L)
1 tbs German mustard
1 tsp Vegemite
1/2 cup milk
100g butter (YES)
150g grana padano, grated

Method

1. Add olive oil to a frying pan, heat on medium. Fry garlic and onion until fragrant.
2. Add the sausage pieces. Cover the fry pan with a lid. Cook until the sausages start to brown. Shake the pan occasionally.
3. While the sausages cook, heat the water for the polenta (different brands of polenta need different amounts of water). Add the Vegemite and German mustard. Bring to the boil. You may have to whisk the mustard into the water to break it up probably.
4. Add the mushrooms to the sausage pan. Stir to get them coated in the sausage fat. Simmer to allow the mushrooms to flavour the sausage fat.
5. Once the polenta 'stock' is boiling, whisk the cup of polenta into the water. Boil for another 60 seconds, still whisking. Turn the heat down to medium, whisking occasionally.
6. Back to the sausage stew. Add the lentils and tomato passata, and some salt and pepper. Stir to combine. Simmer for a few minutes.
7. Back to the polenta. Whisk in the milk and butter. Season well with salt and pepper.
8. Back to the stew. Mix in the spinach, stir, allowing the spinach to only just wilt. Then turn the heat off, putting the lid back on to retain the heat.
9. Back to the polenta. Mix the grana padano cheese in batches, whisking in between to ensure it combines well. Once it is fully combined, the grains are properly cooked, and the consistency is like cream (there should be very soft peaks on top when you lift the whisk out), turn heat on the polenta off.
10. FOR THE LOVE OF GOD, LET THE POLENTA COOL A BIT. It is like lava. It will cool down quicker in the bowls, yes, but it will also cool down really well if you have to leave it to go to hospital with 3rd degree burns.
11. To serve, spoon the polenta into the bowl first, tilting it slightly towards you. This will leave room for the stew. Spoon big served of the stew into the space on the bowls, still with the bowl slightly tilted. Once you sit the bowls upright, the polenta and stew will sit nicely together.

You can add more grana padano cheese to the top if you prefer, but I think it doesn't really need it.

Posted in My Own Recipes | Tagged , , , , , , | Leave a comment

Chocolate, Zucchini, and Quinoa Mini Muffins

If you’re like me, with children like mine, your skill level at hiding vegetables in things is at boss level. I made these for my 9 year old to take to school and she not only likes them, she looks forward to them. Victory is mine.

IMG_1618

This recipe uses raw cacao powder mainly because I had it in the cupboard. I also like the fact that it has a high amount of protein in it. And that’s it. It’s not magic fairy dust that cures cancer, as some would have you believe.

Preheat your oven to 180C

Ingredients

2 1/2 cups self raising flour
1 tsp salt
125g dark chocolate, broken into small pieces
125g butter
250g choc chips
1/4 cup raw cacao powder
1/4 cup honey
1/4 cup brown sugar
1 cup plain yoghurt
2 eggs
1/2 cup (or maybe more, depending on how wet your mix is) milk
1 cup cooked quinoa
1 medium zucchini, grated

Method

1. Melt the butter in a pan on low heat. Once it is melted, add the dark chocolate pieces. Continue to cook on low heat until both are completely melted. I do this only because I cannot melt chocolate without it seizing. Alright, I’m a shit cook, shut up. Anyway, set aside the mixture to cool.

2. Add the dry ingredients to a bowl (not the quinoa, though) and mix thoroughly.

3. Mix the eggs, yoghurt, and milk together. They only need to be combined, not completely incorporated. This is more about helping the thick yoghurt and egg mix in with the dry ingredients later.

4. Like now. Mix the dry ingredients and egg mixture together. Add the honey once they are well mixed. Then add the chocolate butter mixture. Mmmm, chocolate butter mixture.

5. Once they are all incorporated, mix in your choc chips, quinoa, zucchini, and anything else I might have forgotten. Now is when you would add more milk if your mixture is a bit more like playdough than batter. It should be fairly wet, but not liquid.

6. Cut baking paper into squares and shape them into your mini muffin tray holes. I would advise against using patty pans like I have in the photo, as they kind of stick. The kids didn’t care, but it annoyed the shit out of me.

7. Bake at 180C for about 25 minutes, or until they look done. You can test them with a skewer, but as they end up being a rather moist muffin due to the choc chips, zucchini, and quinoa, the skewer will keep coming out with bits of batter on it until they are burnt rocks. Don’t do that.

8. Serve some now to shut up your whinging children (or partner) and freeze the rest in sandwich bags for school lunches. If you fail to prepare for the school day the night before, never fear – apparently they defrost by recess, even if you take them out in the morning.

Posted in My Own Recipes | Tagged , , , , | Leave a comment

Blue cheese, apple, bacon, and caramelised onion empanadas

These are not true empanadas, but I started calling them that because of their shape. They take on the shape simply because the apple doesn’t fit in, otherwise! I made these specifically to be paired with whisky at a private whisky tasting party. The whisky it went best with was The Chita Single Malt by Suntory Whisky.

img_8630

Ingredients

1 sheet of frozen puff pastry, thawed
1 large granny smith apple
150g blue cheese
3 rashers of bacon, diced

Caramelised Onion
1 red onion, sliced thinly
1 tbs brown sugar
1 tbs apple cider vinegar (or any vinegar, really)
Salt to taste

Method

Preheat your oven to 180C

1. Peel the apple and slice thinly – 5mm thick or less. You don’t want it to be very thick at all. Put into acidulated water (a splash of vinegar will do) and set aside.
2. Put a small fry pan onto low heat and add a splash of olive oil. Add the onion, sugar, vinegar, and a sprinkling of salt. Cook the onion down over low heat, stirring occasionally. It will take about 15 minutes, but you should eventually get that ‘caramelised’ smell. Take care not to burn it, as it will turn bitter. Set aside to cool.
3. Roll out your block of puff pastry to about 3mm thick. You may need to sprinkle some plain flour on it first. I used Careme Puff Pastry, which is a bit expensive, but so worth it.
4. Using a 12cm round pastry cutter, or bowl of a similar size and a knife (that’s what I used), cut your rounds from the pastry. If you are short of space, to prevent them from sticking together, place a square of baking paper between each round. If you have offcuts, roll them back together and roll them out to 3mm thick again, using the same process to cut the rounds out.
5. Assemble your pastries by placing two slices of apple across the centre of the pastry, slightly closer to one side than the other. Pile approximately 5 cubes of bacon, a wad of blue cheese, and half a teaspoon or so of caramelised onion on top.
6. Fold the pastry over the top of the filling, so that it meets the opposite edge and completely covers the filling.
7. Crimp the edges of the pastry together with your fingers, empanada style. Ensure there are no holes (the filling will explode out of the holes, otherwise).
8. Bake the empanadas at 180C for approximately 15 minutes or until golden brown and puffed. Ensure they cool before eating – the filling is HOT!

Makes approximately 16 empanadas

Posted in My Own Recipes | Tagged , , , , , | Leave a comment

Beetroot and Blue Cheese Brown Rice Risotto

This is definitely a cheat’s risotto. Brown rice doesn’t cook down properly with the usual stock-ladling method, so you have to use the absorption method. Still tastes just as good.

img_8662

Ingredients

3 whole beetroot, grated
2 cups of brown rice
1 medium brown onion, diced
2 cloves of garlic, sliced finely
150g blue cheese (the stronger, the better)
50g butter (or to taste)
100g parmigiano reggiano (or to taste)
Salt and pepper to taste

Method

1. Cook the onion on medium heat until translucent in a wide, heavy based fry pan. Add the garlic and fry until fragrant.
2. Add the rice to the pan and coat it with the olive oil. Allow it to toast slightly, without burning. Add some salt at this stage.
3. Add 6 cups of water to the pan and cover. Bring to the boil, then simmer for approximately 30 minutes or until the rice is cooked. If it ends up slightly overcooked, that’s fine – risotto is meant to be slightly gluggy.
4. Once the rice is cooked, add the beetroot. If there is still water left in the pan, this is a good thing. You might need to add a splash of water to get the whole thing moving, if not.
5. Once the beetroot is incorporated, cover the pan again and cook on low heat for about 5-10 minutes, until the beetroot loses its rawness.
6. Add the blue cheese and stir thoroughly. The blue cheese should melt into the risotto and help make it more moist.
7. Add the butter and parmigiano reggiano. Stir until mixed through. Taste for seasoning and add salt and pepper accordingly.
8. Serve in bowls, topped with more parmigiano reggiano to taste.

Posted in Cooking Sunday, My Own Recipes | Tagged , , , , , , | Leave a comment

Picky Eater Friendly Tuna Fritters with Hidden Veg

I made these for my picky eaters, aged 8 and almost 2. They gobbled them up and asked for more. I can’t guarantee the same success, but they are also very satisfying for grown ups, too.


Ingredients

400g tin of tuna in brine
1 small zucchini, grated
1 small carrot, grated
1 cup self raising flour
1 egg
1/2 cup yoghurt
1/2 cup milk
1 teaspoon mild german mustard
Salt to taste (don’t be afraid of salt)
Sunflower oil for cooking

Method

1. Mix together the tuna, zucchini, and carrot in a large bowl.
2. Mix the wet ingredients together in a bowl.
3. Sift the flour in. If you don’t have the time to sift, sprinkle it in a bit at a time, mixing in between each sprinkle.
4. Heat about 1-2cm of oil in a medium heat in a wide fry pan.
5. Mix the wet ingredients into the tuna flour mix. Mix well.
6. Test the oil with a tiny amount of tuna batter. It should sizzle around the edges.
7. Fry fritter-sized portions of batter (about a large tablespoon’s worth) until the bottom is browned. It will be tempting to fiddle with it to make sure it’s cooking. Don’t do that. After a few minutes, you’ll see brown edges.
8. Flip over and fry on the other side.
9. Repeat until the batter is used up.
10. Serve with any veggies your picky eaters will consume. Mine will eat it with mashed potato (occasionally with cauliflower added in).

Posted in My Own Recipes | Tagged , , , , , | Leave a comment